

A backyard spa design begins with two questions: where does water drain, and where does electrical service run? The rest follows from those answers. I grew up in Finland where every home had a sauna, most of them outdoors. The planning was practical. Site selection came first. Utilities second. Privacy third. Everything else was secondary.
What Makes a Functional Backyard Spa Design
A functional backyard spa design integrates three wellness elements: heat, cold, and a transition space between them.
The heat source is typically a traditional sauna or an infrared sauna. The cold element can be a plunge tub, a cold shower, or in colder climates, winter air. The transition space is where you cool down gradually, drink water, and rest between rounds.
Most homeowners start with one element and add others over time. That works, but planning for the full system from the beginning saves money and avoids layout mistakes.
Core Elements in Your Design
- Heat structure: Traditional steam sauna or infrared cabin
- Cold therapy: Dedicated plunge tub or outdoor shower
- Transition zone: Covered area with seating, water access
- Changing room: Can be combined with transition space
- Storage: Towels, robes, cleaning supplies
The distance between hot and cold matters. In Finland, we built saunas at the water's edge so the plunge was ten steps away. Your backyard likely doesn't have a lake, but the principle holds. Keep the cold plunge within 15 feet of the sauna door.
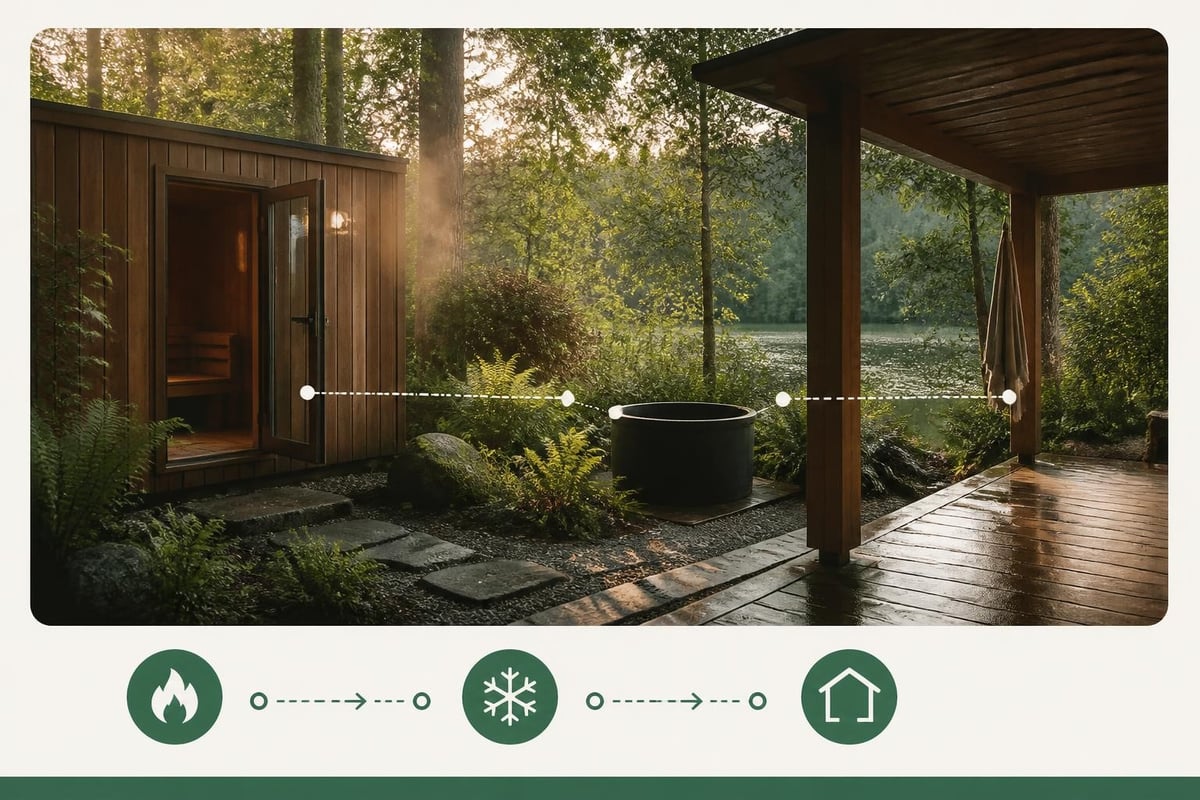
Comparison of Backyard Spa Design Layouts
Different properties require different layouts. Here are the four most common configurations I see.
| Layout Type | Best For | Key Advantage |
|---|---|---|
| Linear | Narrow yards | Efficient use of long spaces |
| Clustered | Small yards | Minimizes walking distance |
| Separated | Large properties | Privacy and noise control |
| Deck-integrated | Existing decks | Uses current structure |
Linear layouts work well along a fence line or property edge. The sauna sits at one end, the cold plunge at the other, with a covered bench area in between.
Clustered designs group everything within a 10-foot radius. This works best in smaller yards where every square foot counts. You can often build a single roof structure that covers the sauna, plunge, and seating.
Separated layouts place the sauna in one area and cold plunge somewhere else. This makes sense when you want the sauna near the house for electrical access but prefer the plunge in a more private corner. The walk between them becomes part of the cooling phase.
Deck-integrated designs build around an existing deck or patio. The sauna sits on one side, the plunge on another, using the deck itself as the transition space.
Site Selection Criteria for Backyard Spa Design
The right location balances six factors. No site is perfect. You're choosing which compromises you can accept.
Electrical Access
Traditional saunas need 240V service. Most electric heaters draw between 6kW and 9kW, requiring a dedicated circuit and proper breaker sizing.
Infrared saunas typically run on standard 120V outlets. This gives you more flexibility in placement but limits you to infrared heat rather than traditional steam.
The cost to run new electrical service increases with distance from your main panel. Every 50 feet adds complexity and expense. I've seen homeowners spend $3,000 bringing power 100 feet to a far corner when a site 30 feet away would have cost $800.
Water and Drainage
Cold plunge tubs need water supply for filling and drainage for emptying. Some designs use garden hoses. Others connect to permanent plumbing.
Drainage matters more than supply. A plunge tub holds 100 to 200 gallons. That water needs somewhere to go when you empty it. Gravity drainage to a lower area of your yard is simplest. Pumping to a connection point adds cost and maintenance.
Traditional saunas don't need water supply inside the structure, but you'll want a hose connection nearby for cleaning. The area around your sauna should drain away from the foundation.
Privacy Considerations
Most backyard spa designs face neighboring properties. Privacy comes from three sources: distance, screening, and orientation.
Distance is the most expensive solution unless you already have a large lot. Screening uses fencing, plantings, or purpose-built privacy walls. Orientation simply means facing your sauna door and seating area away from sight lines.
I recommend combining all three where possible. Place your spa in the most private corner available, add cedar screening on the exposed sides, and orient the entrance toward your house rather than your neighbor's windows.
Natural screening options:
- Evergreen trees (year-round coverage)
- Bamboo screens (fast growth in warmer zones)
- Cedar fence panels (immediate privacy)
- Climbing vines on trellis (softens hard edges)
Level Ground and Foundation
Barrel saunas and smaller structures can sit on gravel pads or patio blocks. Cabin-style saunas and permanent cold plunge installations need level foundations.
A 4-inch gravel base with compacted stone dust works for most prefab sauna kits. The surface needs to be level within 1/4 inch across the full footprint. More slope than that causes door problems and structural stress.
Cold plunge tubs are heavy when filled. A portable 150-gallon plunge weighs roughly 1,300 pounds. The ground beneath needs to be stable and level, or the tub will settle unevenly over time.
Seasonal Weather Patterns
Snow load matters in northern climates. Check your local building codes for required roof strength. Barrel saunas shed snow naturally. Flat or low-slope roofs need structural support for the weight.
Wind exposure affects heat retention and comfort in the transition space. A sauna placed in a wind tunnel loses heat faster and makes the cool-down phase uncomfortable in winter.
Sun exposure during summer determines whether you'll want shade structures or natural tree cover over your transition area. Direct sun on a sauna roof in July doesn't hurt the structure, but it makes the interior uncomfortably hot before you even turn on the heater.
In my childhood home on Lake Saimaa, we built the sauna on the north side of a small rise. This gave us wind protection in winter and natural drainage away from the foundation. The site faced southwest toward the lake, catching afternoon light in the transition area but keeping the sauna itself shaded.
Utility Requirements by Design Type
Different backyard spa configurations have different utility demands. Understanding these before you commit to a layout saves expensive changes later.
Traditional Outdoor Sauna
A traditional steam sauna needs 240V electrical service rated for your heater size. Most residential heaters for a 4-6 person sauna draw 6kW to 8kW.
The electrical run should include:
- Dedicated circuit from main panel
- Appropriate wire gauge (typically 8AWG for 40-amp circuit)
- GFCI protection if required by local code
- Weatherproof disconnect box near the sauna
No permanent water supply is required inside the structure. You need a water source nearby for the bucket that holds water for steam. A garden hose connection 10 to 20 feet away is sufficient.
Infrared Sauna Setup
Most infrared saunas plug into standard 120V outlets. This eliminates the cost of running 240V service but limits your placement options to areas near existing outdoor outlets.
The outlet needs GFCI protection and weatherproof covering. Some homeowners run the power cord through a small conduit or use outdoor-rated extension cords, but this creates tripping hazards and doesn't meet code in most jurisdictions.
If you're serious about daily use, install a dedicated outdoor outlet in the right location rather than working around existing electrical access.
Cold Plunge Infrastructure
A simple plunge tub needs only water supply for filling and drainage for emptying. Garden hose supply works for most residential installations.
Drainage options:
- Gravity drainage: Direct to lower yard area or French drain
- Pump drainage: To garden area or sewer connection
- Manual bucket drain: Slow but requires no infrastructure
Chillers add electrical requirements. Most residential cold plunge chillers run on 120V but draw significant amperage. Check the specifications before assuming your existing outlet can handle it.

Planning Your Transition Space
The area between heat and cold is where you actually spend most of your time during a contrast therapy session. This space needs more attention than most people give it.
A covered area provides shade in summer and rain protection in shoulder seasons. The covering doesn't need to be elaborate. A simple pergola or roof extension from the sauna works.
Seating should accommodate at least as many people as your sauna holds. If you have a four-person sauna, plan for four people to sit comfortably in the transition area.
Essential transition space features:
- Bench or chairs (weather-resistant materials)
- Small table for water bottles
- Hooks for towels and robes
- Lighting for evening use
- Non-slip flooring
The floor surface matters more than most people expect. You'll be barefoot, possibly wet, moving between hot and cold. Composite decking works well. So does textured concrete. Smooth tile or sealed wood becomes slippery and dangerous.
Water access in the transition space is critical. You should be able to drink water without going inside your house. A small outdoor sink or water dispenser keeps you hydrated through multiple rounds.
Cold Plunge Integration
The cold element completes your backyard spa design. Where you place it determines how you'll actually use your system.
Most people either put the plunge too far from the sauna or too close. Too far means the walk becomes a barrier to actually doing the cold plunge. Too close means you splash water on your sauna's foundation or create drainage problems.
The ideal distance is 10 to 15 feet. Close enough that the walk takes under 20 seconds. Far enough that water doesn't become a foundation issue.
A dedicated cold plunge tub like the LeisureCraft Baltic Plunge Tub holds enough water for full-body immersion and sits at a height that makes entry and exit straightforward. The cedar construction matches traditional outdoor saunas, creating visual consistency in your backyard spa design.
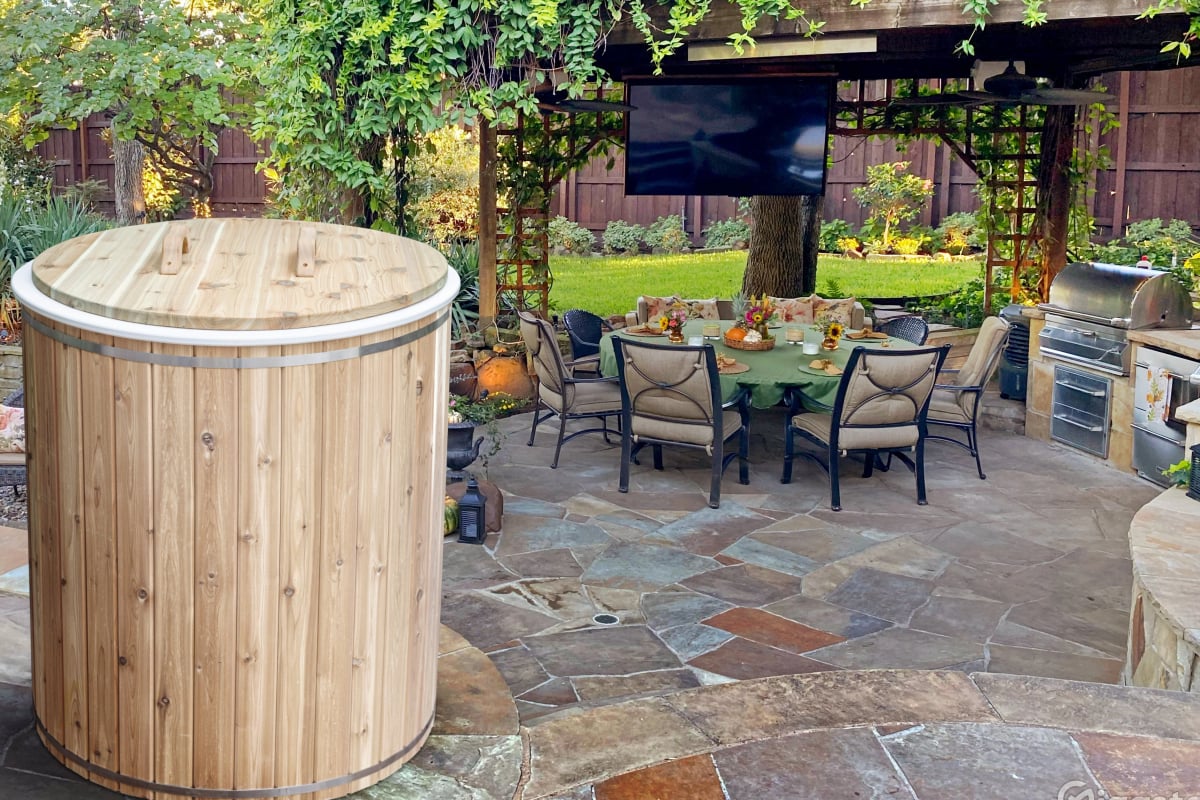
Alternative cold options include outdoor showers, dedicated plunge pools, or in winter climates, simply standing outside in cold air between sauna rounds. Each works. The tub provides the most consistent temperature control and the fullest physiological response.
Cold Water Temperature Management
Unheated plunge water sits at ambient temperature. In summer, that might be 70°F to 75°F. In winter, it can drop to 40°F or below.
The physiological benefit comes from the temperature contrast, not from hitting a specific cold number. A 75°F plunge after a 180°F sauna still provides substantial contrast.
Chillers maintain consistent cold temperatures year-round. They add cost and electrical requirements but remove the seasonal variation.
Combining Sauna Styles in Your Design
Many backyard spa designs include both traditional and infrared heat sources. This isn't redundant. The two types serve different purposes.
Traditional saunas provide löyly, the steam that comes from water on hot stones. This is the heat experience Finns have practiced for two thousand years. It requires higher temperatures (160°F to 195°F) and creates humidity that opens airways and intensifies the heat sensation.
Infrared saunas operate at lower temperatures (120°F to 140°F) with dry heat. The infrared wavelengths penetrate skin differently than convection heat. Some users find this more comfortable for longer sessions or daily use.
If space and budget allow, one of each gives you options. Use the traditional sauna for the full Finnish experience on weekends. Use the infrared cabin for gentler 20-minute sessions on weekday evenings.
Seasonal Adaptations for Year-Round Use
Your backyard spa design should function in January as well as July. That requires planning for seasonal differences.
Winter Considerations
Snow load on the roof must meet local building codes. In areas with heavy snowfall, that typically means reinforced roof framing or steeper roof pitches that shed snow naturally.
The path from your house to the sauna needs snow clearing. You'll be barefoot or in light shoes. A clear, dry path makes winter use practical rather than theoretical.
Traditional saunas actually perform better in cold weather. The greater temperature difference between interior and exterior creates more dramatic heat retention once the structure is warm. The cold plunge becomes as simple as stepping outside between rounds.
Summer Adaptations
Heat management in summer means providing shade over the transition area. Direct sun on seating areas makes rest periods uncomfortable.
Ventilation becomes more important in warm months. Make sure your sauna has adequate air intake and exhaust. Most kit saunas include proper vents. If you're building custom, don't skip this detail.
Water consumption increases in hot weather. You'll need more water for steam in the sauna and more drinking water during rest periods.
Integrating Audio and Lighting Systems
A complete backyard spa design includes sensory elements beyond heat and cold. Quality audio and appropriate lighting enhance the experience without adding complexity.
Outdoor Audio Solutions
Bluetooth speakers rated for outdoor use handle moisture and temperature swings better than indoor electronics. Mount them in the transition area rather than inside the sauna itself.
For a more sophisticated setup, specialists like ANR Media design integrated audio systems for outdoor wellness spaces. These custom installations can include weather-resistant in-ceiling speakers, subwoofers, and whole-property control systems that let you manage audio throughout your backyard spa area.
Keep volume moderate. The point is ambient sound, not a concert. You should be able to speak normally with someone sitting next to you.
Lighting Design
Three types of lighting serve different purposes:
- Safety lighting: Illuminates paths, steps, entries
- Task lighting: Provides adequate light for transitions and practical tasks
- Ambient lighting: Creates atmosphere without brightness
Safety lighting should be on whenever you're using the spa, especially in evening or early morning sessions. LED path lights along walkways and step lights at the sauna entrance prevent trips and falls.
Task lighting over the transition area needs to be bright enough to see clearly but not harsh. Warm white LEDs (2700K to 3000K) work better than cool white.
Ambient lighting can include low-level landscape lights, string lights over seating areas, or color-changing LEDs if that appeals to you. This is personal preference, not necessity.
Maintenance Access in Your Layout
Every structure needs periodic maintenance. Your backyard spa design should make that maintenance straightforward rather than difficult.
Leave at least 18 inches of clearance on all sides of your sauna. This gives you room to inspect the exterior, clean gutters if your design includes them, and access utility connections.
The area around a cold plunge tub needs regular cleaning. Leaves, debris, and algae accumulate faster than you expect. Design the space so you can reach all sides with a hose or cleaning tools.
Storage for maintenance supplies (cleaning solutions, replacement towels, filters for plunge systems) should be within the spa area itself. If you have to go to the garage for basic supplies, you'll skip maintenance tasks.
Privacy Screening Options
Privacy in your backyard spa design creates comfort and reduces self-consciousness during use. Several approaches work, often in combination.
Structural screening:
- Cedar fence panels (6 to 8 feet tall)
- Privacy walls (wood, composite, or metal)
- Lattice screens with climbing plants
Natural screening:
- Evergreen hedges (year-round coverage)
- Ornamental grasses (fast growth, seasonal)
- Bamboo (very fast growth in suitable zones)
Combination approaches:
- Fence with trees behind for height
- Low wall with plantings above
- Pergola with climbing vines
The most effective privacy uses screening at different heights. A six-foot fence blocks ground-level sight lines. Taller plantings or structures block views from second-story windows.
Working Within Local Building Codes
Most jurisdictions regulate permanent structures in residential yards. Backyard spa designs typically fall under these regulations.
Common requirements:
- Setback distances from property lines
- Maximum structure height
- Electrical permits for 240V installations
- Foundation specifications for permanent structures
Prefab sauna kits often qualify as temporary or portable structures, especially if they sit on gravel pads rather than permanent foundations. This can reduce permit requirements, but check with your local building department before assuming exemption.
Electrical work almost always requires permits and inspection. Even if the sauna itself doesn't need a permit, the electrical service probably does.
Fence height limits vary by jurisdiction and by location within your property. Front yard fences typically have lower maximum heights than backyard fences.
Scale and Proportion in Design
A backyard spa should fit your property, not dominate it. Getting the scale right prevents the installation from feeling either cramped or oversized.
For small yards (under 1,000 square feet), a single element makes sense. A barrel sauna or a compact infrared cabin. Add the cold plunge later if space opens up.
Medium yards (1,000 to 3,000 square feet) can accommodate a full two-element system. Sauna and plunge, with transition space between.
Larger properties have room for separated elements, larger structures, or multiple heat sources. The challenge becomes integration rather than fit.
Proportion guidelines:
| Yard Size | Recommended Structure Size | Notes |
|---|---|---|
| Small (under 1,000 sq ft) | 2-3 person barrel or infrared | Vertical storage recommended |
| Medium (1,000-3,000 sq ft) | 4-person sauna + plunge | Clustered layout efficient |
| Large (3,000+ sq ft) | 6-person cabin + separate plunge | Can separate elements |
The sauna should not occupy more than 10% of your usable yard space unless the yard is specifically designed as a wellness retreat.
First-Time Design Mistakes to Avoid
I've seen the same errors repeatedly over fifteen years. Most are fixable but cost time and money to correct.
Underestimating electrical costs: Running 240V service 80 feet to a far corner can cost more than the sauna itself. Place your sauna where power access is reasonable, or choose infrared if you need distant placement.
Ignoring drainage: Water from cleaning, from melted snow, or from emptying a plunge tub needs somewhere to go. Sloping the site away from structures prevents foundation problems.
Skipping the transition space: Building only the sauna and plunge without planning where you'll sit between rounds creates an incomplete experience. The transition space is not optional.
Choosing visual appeal over function: A sauna that looks perfect from your kitchen window but requires a 100-foot walk in January won't get used. Prioritize practical access over aesthetics.
Ordering the wrong size: Manufacturers list capacity optimistically. A "4-person" sauna is comfortable for two adults. A "6-person" fits four comfortably. Add one to two people beyond your actual regular usage.
Planning for Future Expansion
Most people start with one element and add others over time. Design your initial installation to accommodate likely additions.
If you start with just a sauna, leave space 10 to 15 feet away for a future cold plunge. Run the electrical service with capacity for both, even if you're only installing one heater initially.
If you start with just a cold plunge, plan the transition space large enough to later accommodate a sauna on one side.
The least expensive time to add infrastructure is during initial construction. Adding a second electrical circuit later requires trenching again, pulling permits again, and potentially disturbing landscaping.
Frequently Asked Questions
How much space do I need for a basic backyard spa design?
A minimal setup requires about 150 square feet. That includes a small sauna (roughly 6x6 feet), a compact cold plunge (4x3 feet), and a narrow transition area between them. More comfortable designs use 250 to 400 square feet.
Can I put a sauna on an existing deck?
Yes, if the deck structure can support the weight. A typical barrel sauna weighs 600 to 800 pounds. A cabin-style sauna can weigh 1,200 to 2,000 pounds. Check with a structural engineer if your deck is more than five years old or shows any signs of weakness.
Do I need to run water lines to the sauna?
No. Traditional saunas don't require internal plumbing. You only need water access nearby for the bucket you use to create steam. A garden hose connection within 20 feet is sufficient.
What's the best distance between sauna and cold plunge?
Ten to fifteen feet works for most layouts. Closer than ten feet risks drainage conflicts. Farther than fifteen feet and the walk becomes long enough that some people skip the cold plunge on colder days.
Should I install the sauna or the cold plunge first?
Either works. Many people start with the sauna because it's the primary heat source and can be used alone. The cold element enhances the experience but isn't required for basic sauna practice. Budget and available space should determine order.
Backyard spa design works when you start with utility access and site drainage rather than aesthetics. The specific structures matter less than the functional relationship between heat, cold, and transition space. If you're planning a home sauna installation or expanding into full contrast therapy, Petri answers technical questions about layout, electrical requirements, and equipment selection. Ask Petri about your sauna project.
Share:
Cold Plunge After Sauna: Finnish Contrast Therapy Guide
Home Spa: What to Build, Where to Start, and What to Skip